Tag Archives: javascript

2 of N: Gephi, D3.js, and maps: Success!

gephileafletd3js
A working, geographically accurate map using Gephi, D3.js, and Leaflet. NOTE: Link subject to change.

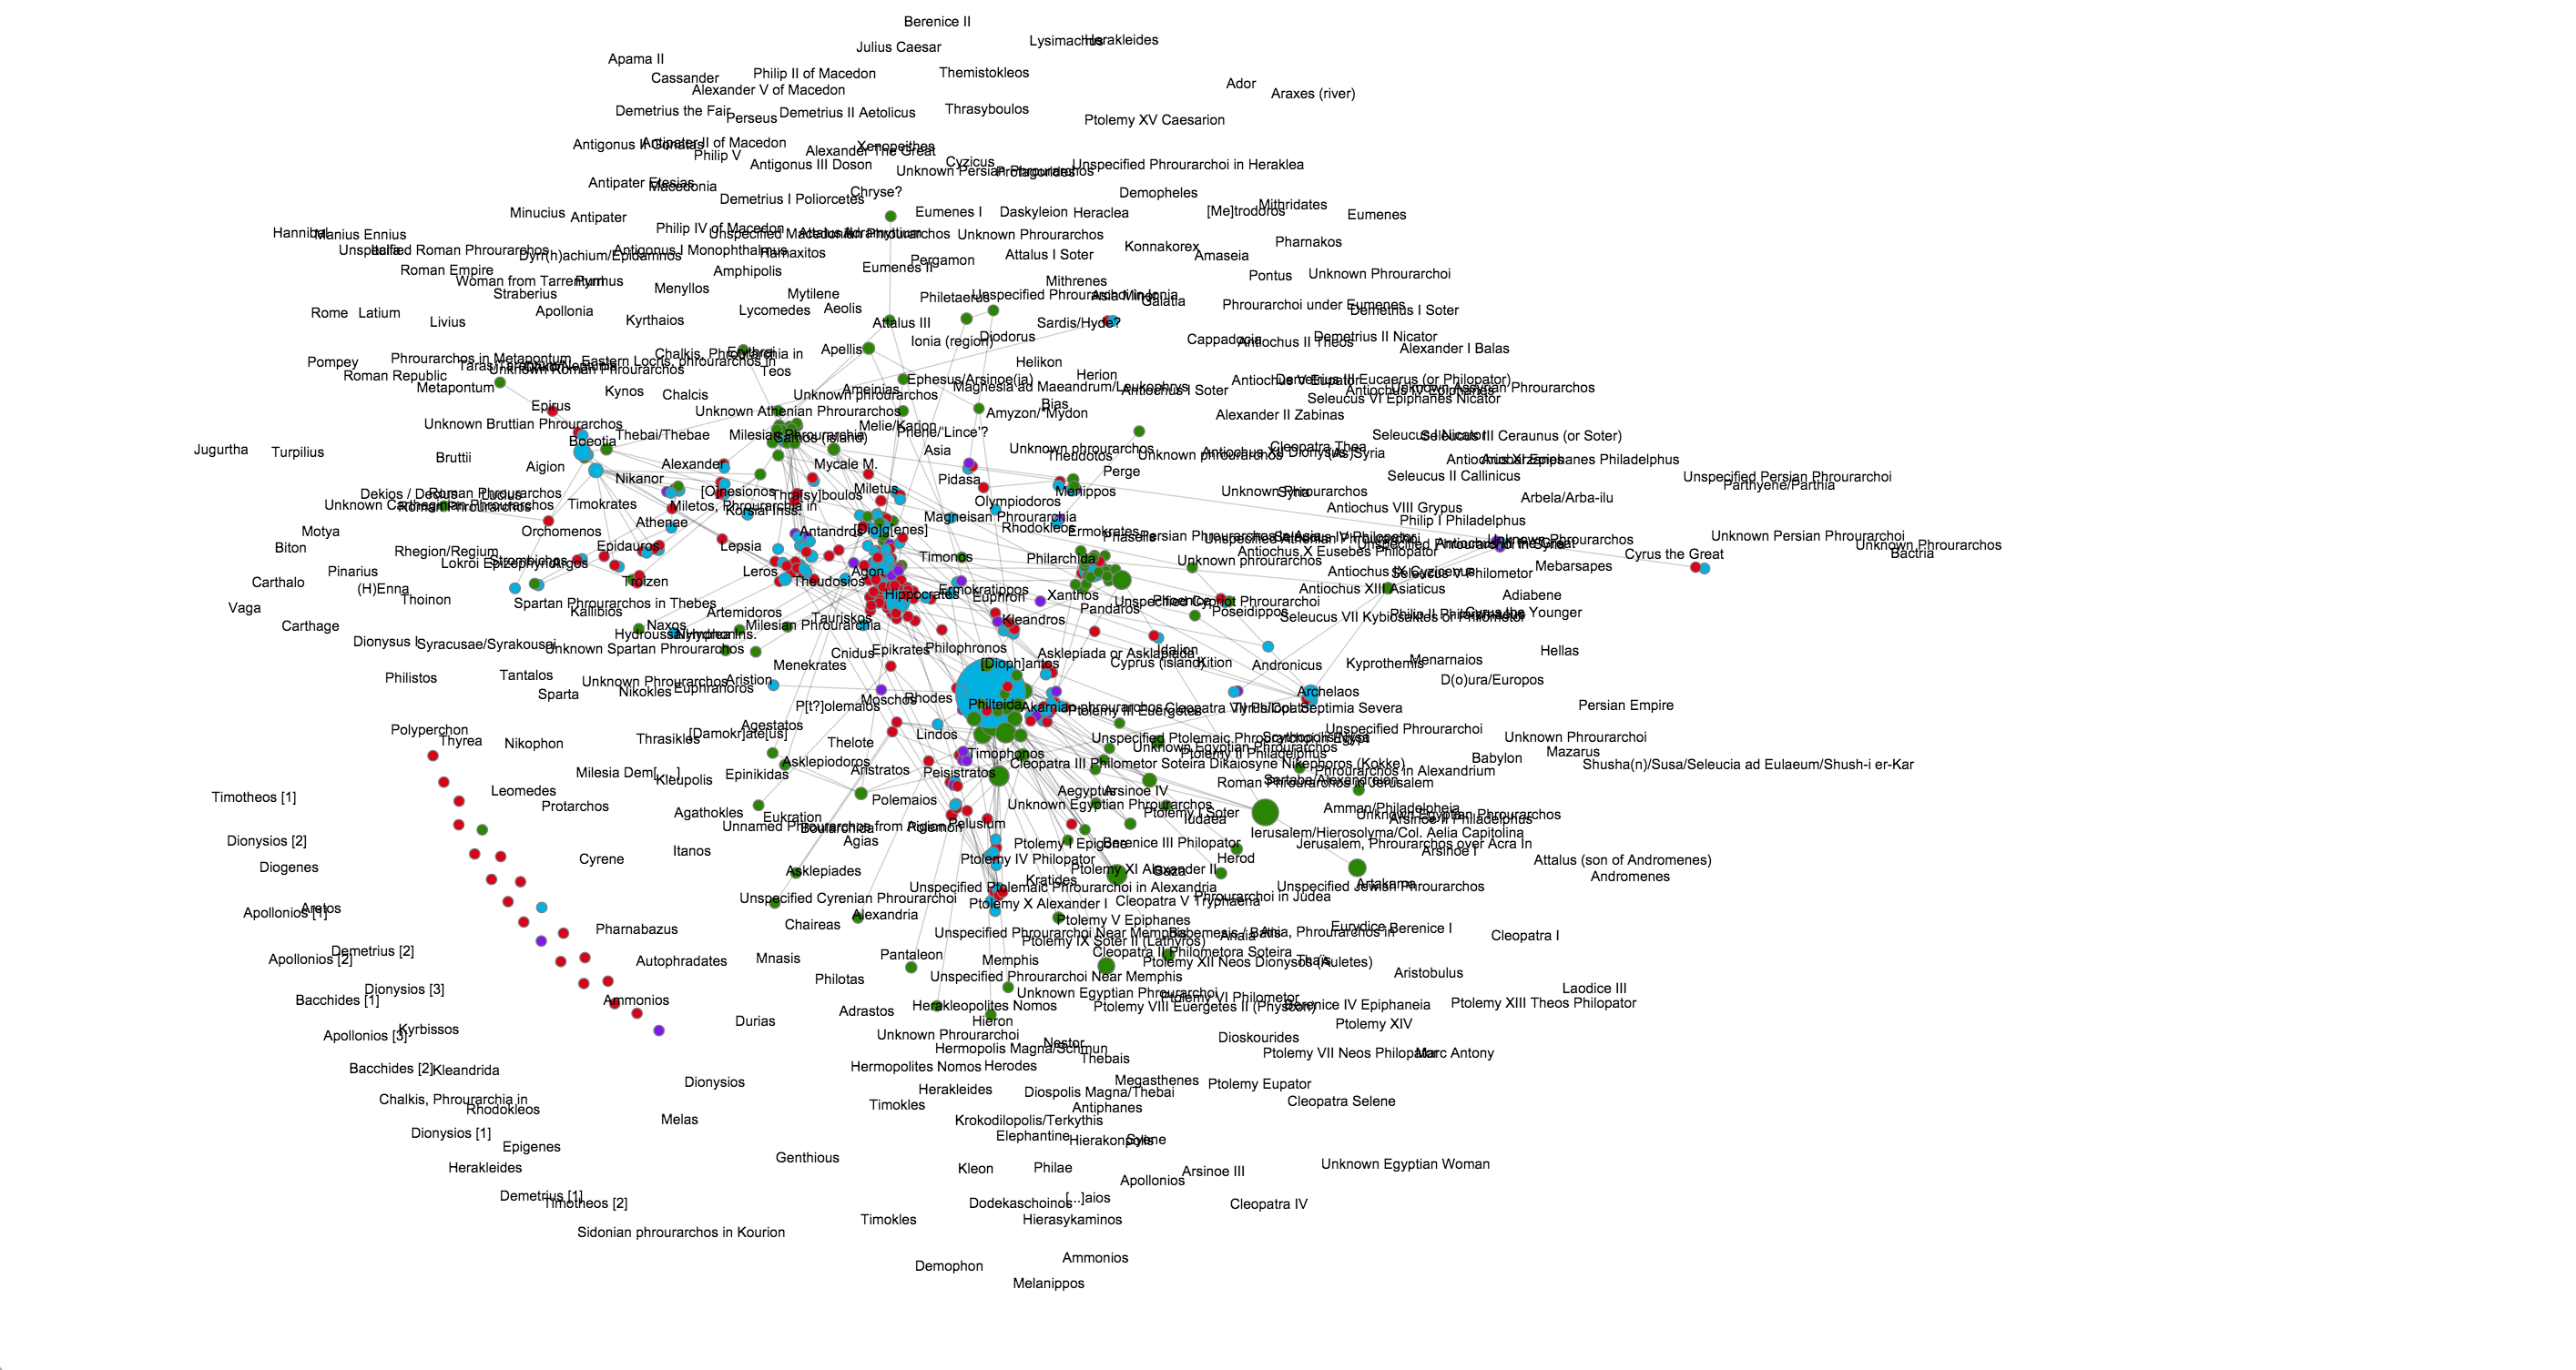
In my previous post I outlined how I used D3.js to display a “raw” JSON output from Gephi. After some hacking around, I am now able to display my Gephi data on an interactive leaflet map!

This is a departure from other work on the subject for a few reasons:

  1. Not all of my data has geographic information – indeed in many cases a specific longitude / latitude combination is inappropriate and would lend a false sense of permanence to anyone looking at the map. In my case I have names of Greek garrison commanders which have some relation to a place, but it is unclear in some instances if they are actually at a specific place, have dominion over the location, or are mentioned in an inscription for some other reason. Therefore, I need to locate data that has a fuzzy relation to a location (ancient people who may originate, reside, work, and be mentioned in different and / or unknown locations) and locations that may themselves have fuzzy or unknown geography. This is a problem for just about every ancient to pre-modern project, as we do not have a wealth of location information, or even a clear idea of where some people are at any particular moment.
  2. I want to show how social networks form around specific geographic points which are known, and have those social networks remain “reactive” on zooms, changing map states, etc. This can be expanded to encompass epistolary networks, knowledge maps, etc – basically anything that links people together who may not be locatable themselves.
  3. Gephi does not output in GeoJSON, and the remaining export options that are geographically oriented require that *all* nodes have geographic information. As this is not my case (see above), the standard export options will not work for me. Also, as part of my work on BAM, I want to create a framework that is as “plug and play” as possible, so that we can simply take Gephi files and drop them into the system to make new modules. Therefore this work has to be reproducible with a minimum of tweaking.

So, let us get to the code!

First things first: You need to make your html, bring in your javascript,and style some elements. I put the css in the file for testing – it will be split off later.


<!DOCTYPE html>

<head>
<meta name='viewport' content='width=device-width, initial-scale=1.0, maximum-scale=1.0, user-scalable=no' />
<!-- Mapbox includes below -->
<script src='https://api.mapbox.com/mapbox.js/v2.2.2/mapbox.js'></script>
<link href='https://api.mapbox.com/mapbox.js/v2.2.2/mapbox.css' rel='stylesheet' />
<script src="https://ajax.googleapis.com/ajax/libs/jquery/2.1.3/jquery.min.js"></script>
<script src="http://d3js.org/d3.v3.js"></script>
</head>
<meta charset="utf-8">
<!-- Will split off css when done with testing -->

<style>
.node circle {
stroke: grey;
stroke-width: 10px;
}

.link {
stroke: black;
stroke-width: 1px;
opacity: .2;
}

.label {
font-family: Arial;
font-size: 12px;
}

#map {
height: 98vh;
}

#attributepane {
display: block;
display: none;
position: absolute;
height: auto;
bottom: 20%;
top: 20%;
right: 0;
width: 240px;
background-color: #fff;
margin: 0;
background-color: rgba(255, 255, 255, 0.8);
border-left: 1px solid #ccc;
padding: 18px 18px 18px 18px;
z-index: 8998;
overflow: scroll;
}
</style>

<body>

<div id='attributepane'></div>

<div id='map'>
</div>

Next, make a map.

<script>
var map = L.mapbox.map('map', 'yourmap', {
accessToken: 'yourtoken'
});

//set the initial view. This is pretty standard for most of the ancient med. projects
map.setView([40.58058, 36.29883], 4);

Pretty basic so far. Next we follow some of the examples that are already in the wild to initiate D3 goodness:


var force = d3.layout.force()
.charge(-120)
.linkDistance(30);

/* Initialize the SVG layer */
map._initPathRoot();

/* We simply pick up the SVG from the map object */
var svg = d3.select("#map").select("svg"),
g = svg.append("g");

Next, we bring in our json file from Gephi. Again, this is pretty standard:


d3.json("graph.json", function(error, json) {

if (error) throw error;

Now we get into the actual modifications to make the json, D3, and leaflet all talk to each other. The first thing to do is to modify the colors (from http://stackoverflow.com/questions/13070054/convert-rgb-strings-to-hex-in-javascript) so that D3 displays what we have in Gephi:


//fix up the data so it is what we want for d3
json.nodes.forEach(function(d) {
//convert the rgb colors to hex for d3
var a = d.color.split("(")[1].split(")")[0];
a = a.split(",");

var b = a.map(function(x) { //For each array element
x = parseInt(x).toString(16); //Convert to a base16 string
return (x.length == 1) ? "0" + x : x; //Add zero if we get only one character
})
b = "#" + b.join("");
d.color = b;

Next, we need to put in “dummy” coordinates for locations that do not have geography. This is messy and could probably be removed with some more efficient coding later. For the nodes that do have geography, the map.latLngToLayerPoint will translate the values into map units, which places them where they need to go. These are simply lat lon attributes in the Gephi file. I also set nodes that are fixed / not fixed, based on the presence of lat/lon data.


if (!("lng" in d.attributes) == true) {
//if there is no geography, then allow the node to float around
d.LatLng = new L.LatLng(0, 0);
d.fixed = false;
} else //there is geography, so place the node where it goes
{
d.LatLng = new L.LatLng(d.attributes.lat, d.attributes.lng);
d.fixed = true;
d.x = map.latLngToLayerPoint(d.LatLng).x;
d.y = map.latLngToLayerPoint(d.LatLng).y;
}
})

Now to setup the links. As we are keyed on attributes and not an index value, we need to follow this fix:


var edges = [];
json.edges.forEach(function(e) {
var sourceNode = json.nodes.filter(function(n) {
return n.id === e.source;
})[0],
targetNode = json.nodes.filter(function(n) {
return n.id === e.target;
})[0];

edges.push({
source: sourceNode,
target: targetNode,
value: e.Value
});
});

var link = svg.selectAll(".link")
.data(edges)
.enter().append("line")
.attr("class", "link");

Now to setup the nodes. I wanted to do a popup on a mouseclick event, but for some reason this is not firing (mousedown and mouseover do work, however). The following code builds the nodes, with radii, fill, and other information pulled from the JSON file. It also toggles a div that is populated with attribute information from the JSON. There is still some work to do at this part: the .css needs to be cleaned up, images need to be resized, and the attribute information for the nodes should be a configurable option when importing the JSON.


var node = svg.selectAll(".node")
.data(json.nodes)
.enter().append("circle")
//display nodes and information when a node is clicked on
//for some reason the click event is not registering, but mousedown and mouseover are.
.on("mouseover", function(d) {

//put in blank values if there are no attributes
var titleForBox, imageForBox, descriptionForBox = '';
titleForBox = '
<h1>' + d.label + '</h1>

';

if (typeof d.attributes.Description != "undefined") {
descriptionForBox = d.attributes.Description;
} else {
descriptionForBox = '';
}

if (typeof d.attributes.image != "undefined") {
imageForBox = '<img src="' + d.attributes.image + '" align="left">';
} else {
imageForBox = '';
}

var htmlForBox = imageForBox + ' ' + titleForBox + descriptionForBox;
document.getElementById("attributepane").innerHTML = htmlForBox;
toggle_visibility('attributepane');
})
.style("stroke", "black")
.style("opacity", .6)
.attr("r", function(d) {
return d.size * 2;
})
.style("fill", function(d) {
return d.color;
})
.call(force.drag);

Now for the transformations when the map state changes. The idea is to keep the fixed nodes in the correct place, but to redraw the “floating” nodes when the map is zoomed in and out. The nodes that need to be transformed are dealt with first, then the links are rebuilt with the new (or fixed) x / y data.


//for when the map changes viewpoint
map.on("viewreset", update);
update();

function update() {

node.attr("transform",
function(d) {
if (d.fixed == true) {
d.x = map.latLngToLayerPoint(d.LatLng).x;
d.y = map.latLngToLayerPoint(d.LatLng).y;
return "translate(" +
map.latLngToLayerPoint(d.LatLng).x + "," +
map.latLngToLayerPoint(d.LatLng).y + ")";
}
}
);

link.attr("x1", function(d) {
return d.source.x;
})
.attr("y1", function(d) {
return d.source.y;
})
.attr("x2", function(d) {
return d.target.x;
})
.attr("y2", function(d) {
return d.target.y;
});

node.attr("cx", function(d) {
if (d.fixed == false) {
return d.x;
}
})
.attr("cy", function(d) {
if (d.fixed == false) {
return d.y;
}
})

//this kickstarts the simulation, so the nodes will realign to a zoomed state
force.start();
}

Next, time to start the simulation for the first time and close out the d3 json block:


force
.links(edges)
.nodes(json.nodes)
.start();
force.on("tick", update);

}); //end

Finally, time to put a function in to toggle the visibility of the div (from here) and close out our file:


function toggle_visibility(id) {
var e = document.getElementById(id);
if (e.style.display == 'block')
e.style.display = 'none';
else
e.style.display = 'block';
}
</script>
</body>

There you have it- a nice, interactive map with a mix of geographic information and social networks. While I am pleased with the result, there are still some things to fix / address:

  1. The click even not working. This is a real puzzler.
  2. Tweaking the distances of the simulation – I do not want nodes to be placed half a world away from their connections. This may have to be map zoom level dependent.
  3. Style the links according to Gephi and provide popups where applicable. This should be easy enough to do, but simply hasn’t been done in this code.
  4. Tweak the visibility of the connections and nodes. While retaining an option to show the entire network at once, my idea is to have a map that starts out with JUST the locations, and then makes the nodes that are connected to that location visible when you click on it (which would also apply to the unlocated nodes – i.e. you see what they are connected to when you click on them).
  5. Connected to the above point, the implementation of a slider to show nodes in a particular timeframe. As my data spans a period from the 600s BCE to the 200s CE, this would provide a better snapshot of a particular network at a particular time.
  6. Implement a URI based system – you will be able to go to address/someEntityName and that entity will be selected with its information pane and connected neighbors displayed. This will result in an RDF file that will be sent to the Pelagios Project.
  7. Fix up the .css for the information pane.

I will detail further steps in a later post.

1 of N: Gephi, D3.js, and maps

Update (11/12/15): See this post to integrate the following code with leaflet.

After finding no real way to use background maps with SigmaJs, I stumbled on this example of combining leaflet with D3.jshttp://bost.ocks.org/mike/leaflet/. The example is more closely aligned with what I want to achieve, which is using a display library to show a social network that respects / interacts with underlying geography. This would be a very valuable visualization for both TBib/BAM and my own work on garrisons, and completing it will allow me to get back to other tasks, like pounding out Greek inscriptions.

For this work I am not tied to Gephi, but I do like its interface and low learning curve, which is valuable for pedagogical and collaborative use. So, my first order of business is getting a Gephi project to talk nicely with D3.js. There is, of course, a nice example already in the wild: http://bl.ocks.org/susielu/9526340. However, this presented some serious problems, which I will outline to (hopefully!) help others who may be going down this path. So, refer back to http://bl.ocks.org/susielu/9526340 for the code template – what follows below are additions / modifications.

geo-attemprFor this project, I want to recreate the image to the right, which was created in Gephi. If you read my previous post on this topic, this image uses a geo-layout plugin to place locations from Pleiades in their correct geographic placement, then uses other layouts to place the people and other non locatable nodes. The eventual goal is to make an interactive network map above an interactive geographic map, so simply exporting these out as a flat svg file will not provide the functionality I need.

My first attempt to simply plug in my own data met with disaster. First, I got hit with an “Uncaught TypeError: Cannot read property ‘weight’ of undefined” error and absolutely no graph. Looking into it, I noticed that the example assumed that nodes would be referenced by their position in an index, NOT by their own id.


 var links = json.edges.map(function(d){
 return {
 'source': parseInt(d.source),
 'target': parseInt(d.target)
 }
 })

My linkages use a unique ID text attribute, which plays havoc with this function. However, this seems like a simple fix: simply remove the parseInt() function, and the actual linkages should work.


var links = json.edges.map(function(d){
 return {
 'source': d.source,
 'target': d.target
 }
 })

netminusnetGetting closer: I see a network graph….only minus the network. Yikes. So, what is going wrong?

It seems that linking nodes by attribute instead of index is a somewhat common problem in D3.js, with a good solution here: http://stackoverflow.com/questions/23986466/d3-force-layout-linking-nodes-by-name-instead-of-index. Following this example, I modified my code by adding the following:


var edges = [];
links.forEach(function(e) {
// Get the source and target nodes
var sourceNode = nodes.filter(function(n) { return n.id === e.source; })[0],
targetNode = nodes.filter(function(n) { return n.id === e.target; })[0];

// Add the edge to the array
edges.push({source: sourceNode, target: targetNode});
});

...

var force = d3.layout.force()
.nodes(nodes)
.links(edges)

...

var link = svg.selectAll(".link")
.data(edges)

workingFinally, the links show! The nodes, however, are of a uniform size. I want the nodes to reflect their size in Gephi. Luckily this was an easy fix: adding


.attr("r", function(d) { return d.size * 3; })

to

 node.append("svg:circle") 

did the trick. I also wanted to add colors from Gephi – the following code does so (with a conversion from RGB to hex provided by http://stackoverflow.com/questions/13070054/convert-rgb-strings-to-hex-in-javascript) :


var a = d.color.split("(")[1].split(")")[0];
a = a.split(",");

var b = a.map(function(x){ //For each array element
 x = parseInt(x).toString(16); //Convert to a base16 string
 return (x.length==1) ? "0"+x : x; //Add zero if we get only one character
})

b = "#"+b.join("");

 
 return {
 'id' : d.id,
 'x' : d.x,
 'y' : d.y,
 'fixed': true,
 'label' : d.label,
 'size' : d.size,
 'color' : b,
 }
 
 })

and


.style("fill", function (d) { return d.color; })

added to


node.append("svg:circle")

onemoreproblemThis produces a graph that looks correct except for one MAJOR problem: It seems the Y axis is inverted from the original! This is obviously not acceptable if I am trying to capture actual coordinates for a map. All is not lost: I do remember this being a problem in the SigmaJS exporter. A fix is provided here: https://github.com/oxfordinternetinstitute/gephi-plugins/issues/5#issuecomment-22291683. For me, this was as simple as adding the following code:


finalY = -d.y;
return {
'id' : d.id,
'x' : d.x,
'y' : finalY,
'fixed': true,
'label' : d.label,
'size' : d.size,
'color' : b,
}

})

to the

  var nodes = json.nodes.map(function(d)

block.

inorderThe next task will be to finalize some functionality for the D3.js portion of the graph, then on to integrating the whole mess with leaflet. Then, when I have all of this in order, time to re-write it to accept all manner of different inputs / etc for BAM. More on both of these ideas later.

Code for BAM: Part 1 of N. Gephi and Maps

This is the first in a series of posts where I will be detailing some of the code and development of BAM. Some of these techniques may be old hat for some users or simple hacks, but they might be useful for anyone else who is trying to do similar work.

TBib-select
Terra Biblica with both the social network graph and map displaying information on Jesus.

In this post, I will detail how I got Gephi data (produced by the SigmaJs Exporter) to communicate with an OpenLayers 2 map. When a user clicks on any entity in the network graph the map panel will adjust to show the locations and frequency of that entity in geographic space. At the same time, any clicks on an entity name on the map (provided by a popup) will adjust the social network graph to highlight that entity. This code is built on javascript, PHP, and a PoistGIS backend. At some point in the future BAM may transition to OpenLayers 3, but for now we are sticking with 2 as it formed the basis for À-la-Carte, Digital Strabo, and other digital efforts that BAM builds upon and extends.

For a working demonstration of the final result, see http://awmc.unc.edu/awmc/applications/bam/luke/. All of the code mentioned in this post, and created for BAM, is available at: https://github.com/Big-Ancient-Mediterranean/BAM.

Step 1: Get your data in order!

Before attempting any of this, you need to ensure that the entities that you are using in Gephi and the ones you have in your database have a consistent, unique ID. So, if Andrew has an id of 1234567 in Gephi, you need to associate 1234567 with different locations, texts, etc in your database that are also related to Andrew. Failure to do so will make it VERY difficult, if not impossible, to get all of the different components to talk to each other.

Next, you actually need to build your network in Gephi and export it out. Building the network itself is beyond the scope of this post, but you need to install and familiarize yourself with the excellent SigmaJs Exporter created by Scott Hale at the Oxford Internet Institute. Essentially what we are doing is taking the output of the SigmaJs Exporter, cutting it down, and making it communicate with a dynamic, interactive map on the same webpage.

directoryAfter exporting your network using the SigmaJs Exporter, you should have a directory structure that roughly looks like the screenshot to the right. You want to upload everything but htaccess_exampleweb.config, and index.html to your webserver.

We then need to add this network to an HTML file that already has a map. In our case, we are modifying the code behind Strabo Online and SNAGG. I may detail how to create a map in another post, but there are plenty of resources online to get you going on a basic map.

We are going to mimic the functionality of the index.html file that we excluded in our own html file. First, we need to include the various javascript files and libraries used by the application:


<script src="js/jquery/jquery.min.js" type="text/javascript"></script>
<script src="js/sigma/sigma.min.js" type="text/javascript" language="javascript"></script>
<script src="js/sigma/sigma.parseJson.js" type="text/javascript" language="javascript"></script>
<script src="js/fancybox/jquery.fancybox.pack.js" type="text/javascript" language="javascript"></script>
<script src="js/main.js" type="text/javascript" language="javascript"></script>

<link rel="stylesheet" type="text/css" href="js/fancybox/jquery.fancybox.css"/>
<link rel="stylesheet" href="css/style.css" type="text/css" media="screen" />
<link rel="stylesheet" media="screen and (max-height: 770px)" href="css/tablet.css" />

Now we need to place some divs to hold the content from our social network. These can be styled at your leisure.


<div style="padding-left: 1%;padding-right: 1%;" id="socialNetContainer" class="socialNetContainer">

<div class="sigma-parent">

<div class="sigma-expand" id="sigma-canvas">

<div style="z-index:9994" id="attributepane">

<div class="text">

<div title="Close" class="left-close returntext">

<div class="c cf">
<span>Return to the full network</span>
</div>

</div>


<div class="nodeattributes">

<div class="name"></div>


<div class="data"></div>


<div class="p">Connections:</div>


<div class="link">

<ul>
</ul>

</div>

</div>

</div>

</div>

</div>

</div>

</div>


Now that we have all the functionality of the SigmaJs Exporter in our map, we need to make the components talk to each other. First, we need to identify what node is active on the sigma.js div, and use that information to select the appropriate data for our map. The function nodeActive in SigmaJs identifies what / when a node is active – so we will extend this to pass that information to a variable (for a more detailed explanation on how to extend a javascript function, see http://coreymaynard.com/blog/extending-a-javascript-function/).

We are also going to create a separate function to deal with adjusting the map itself, called tBibPersonConnections, which will be called in our new, extended function:

(function() {
//first copy the old function in the new one
 var old_nodeActive = nodeActive;

//new function with the same name as the old one - this overrides the old function
 nodeActive = function() {

//we are going to build the map from the person_id that is called from the node
// this is a separate function that will be explained below 
 tBibPersonConnections(arguments[0], tBibPeoplelayer);
 activePerson = arguments[0];

// Calls the original function\
 var result = old_nodeActive.apply(this, arguments);

// now return the result
 return result;
 }
})();

tBibPersonConnections is where the work really happens. Lets examine this function slowly.


function tBibPersonConnections(personNameChoice, tBibPeoplelayer)
{
 var dataStringForFeature ='pid=' +personNameChoice +'&amp;amp;amp;amp;amp;amp;start=0';
 tBibPeoplelayer.destroyFeatures();
 tBibfeaturesOnMap =[];

 $.ajax({
 dataType: "json",
 type:'GET',
 data:dataStringForFeature,
 url:'tbib_mapmaker.php',
 success:function(dataJson) {
 for (var i = 0; i &amp;amp;amp;amp;amp;lt; dataJson.features.length; i++){
 var untransformed_feature = geojson_format.read(dataJson, "FeatureCollection");
 //for some reason this is going into an array. Going to hardcode for now
 for (var j = 0; j &amp;amp;amp;amp;amp;lt; dataJson.features.length; j++){
 if (tBibfeaturesOnMap.indexOf(untransformed_feature[j].attributes.pid) &amp;amp;amp;amp;amp;lt; 0){
 tBibPeoplelayer.addFeatures(untransformed_feature[j]);
 tBibfeaturesOnMap.push(untransformed_feature[j].attributes.pid);
}
}
 tBibPeoplelayer.refresh({force:true}); 
 }
 },
 error: function (xhr, ajaxOptions, thrownError) {
 alert(xhr.responseText);
 }
 });

}

The function takes the ID of the person selected and layer that houses all of the feature information as arguments.

The first thing we do is create parameters for the PHP file that will return all of the place / feature information that is associated with an individual person. Do not worry about the “start” parameter for now, as it is only used when resetting the map to an initial state. The lines

tBibPeoplelayer.destroyFeatures();
tBibfeaturesOnMap =[];

first clear the map layer of all features, and then sets up an array to hold all of the new features that we will be adding to the map.

The AJAX call to tbib_mapmaker.php actually queries our database, and returns each feature that is associated with an individual, the number of times the individual is mentioned with the feature, and the geographic location of the feature. While the actual sql calls are specific to this application / database, I will show what we are doing for combining Pleiades data, BAM data, and the map:

$query = "select
pplaces.title, count(pplaces.title), max (pplaces.id) as pleaides_id,
ST_AsGeoJSON(ST_Transform(max(pplaces.the_geom), 3857)) as geom
from pplaces
JOIN
tbib_pleiades
ON
pplaces.id = tbib_pleiades.pleiades_id
JOIN
tbib_network
ON
tbib_pleiades.verse = tbib_network.reference
where
character_1 = '$pidParam' or character_2 = '$pidParam'
GROUP BY
pplaces.title";

We are interested in every occurrence of an individual, so we do not care if the person is the target or the source. Our tbib_network table is exactly the same as the table used to build our Gephi network, and all people are assigned a unique ID that remains consistent across tables.

At the end of the .php file, all of the results are returned in json format:

//make a geojson object
while($row =pg_fetch_assoc($qry_result)){
//resize for map
$sizeForMap = (($row[count] / 10) + 1);

//arrange for map
$arr[] = array(
"type" => "Feature",
"geometry" => json_decode($row[geom]),
"properties" => array(
 "title" =>$row[title],
 "count" =>$sizeForMap,
 "pid" => $row[pleaides_id]
 ),
);
}
//encode into geojson
$geojson = '{"type":"FeatureCollection","features":'.json_encode($arr).'}';
echo $geojson;
?>

In the future, this database work will be mirrored by static json files, to allow for the easy export / import of BAM material.

When the PHP file returns a json string, the function then pulls it apart, creates new OpenLayers features, and then adds them to the map:

 success:function(dataJson) {
 for (var i = 0; i < dataJson.features.length; i++){
 var untransformed_feature = geojson_format.read(dataJson, "FeatureCollection");
 for (var j = 0; j < dataJson.features.length; j++){
 if (tBibfeaturesOnMap.indexOf(untransformed_feature[j].attributes.pid) < 0){
 tBibPeoplelayer.addFeatures(untransformed_feature[j]);
 tBibfeaturesOnMap.push(untransformed_feature[j].attributes.pid);
}
}
 tBibPeoplelayer.refresh({force:true}); 
 }
 },

The result is a layer that changes depending on what person is clicked.

A user selected popup

That is great for changing the map, but what about changing the nodes on the network graph for when an individual is selected on the map?

As we are displaying people names, not ID as clickable information in our popups, we need a way to translate the names to the IDs used by SigmaJs. This is simply a trivial php script that looks up an ID from a name table. Once the ID is returned, we simply activate the node with a call to the nodeActive function that we extended earlier and to our tBibPersonConnections function.

First, however, we have to listen for the event where the popup on the map is clicked:


//this is the popup listner

$('#popupSnagTable tbody').on( 'click', 'td', function () {
//now to start stripping out to what we need
var columnName = $('#popupSnagTable thead tr th').eq($(this).index()).html().trim();
if (columnName == 'Reference')

{
var ActiveRef = $(this).html().trim();
ActiveRef = ActiveRef.replace('Lk ','');
var ActiveRefSpilt = ActiveRef.split(":");
activeChapter = ActiveRefSpilt[0];
activeVerse = ActiveRefSpilt[1];
getPerseusText($(this).html().trim(), 0);
}
//if the user clicks on a name, then we use this to make an ajax call
if ((columnName == 'Entity 1') || (columnName == 'Entity 2')){
var personNameChoice = $(this).html().trim();

var dataString = 'pid='+personNameChoice;

$.ajax( { type:'GET', data:dataString, url:'bamIdFromNum.php', success:function(data2)

{

//from the sigma.js gephi instance

nodeActive(data2);

//now to add all of the places the entity is on the map. Searching by ID

tBibPersonConnections(data2, tBibPeoplelayer);

}

});

That is all there is to it – just a few listeners and a variable or two. There may be more efficient ways of doing this, but all the components are talking to each other!